One of the most worrisome features of aging is reduced muscle mass. Consequently, decreases in strength as high as 20–40% are reported in individuals after age 30, and this loss increases throughout the lifespan. Foot muscles are highly susceptible to age-related atrophy, a process that’s also exacerbated by the long-term wearing of ill-fitting footwear. Several studies confirm that older people exhibit approximately 24–40% less strength in muscles responsible for movement of the foot and ankle than young people.

(1) abductor hallucis, (2) flexor digitorum brevis, (3) abductor digiti minimi, (4) quadratus plantae (note its insertion into the flexor digitorum tendon), (5) lumbricals (6) flexor digiti minimi, (7) adductor hallucis oblique (8) flexor hallucis brevis, (9) plantar interossei, (10) dorsal interossei and (11) extensor digitorum brevis
Studies shows that decreased ankle dorsiflexion range of motion increases the risk of devastating falls. Decreased ankle plantarflexor strength is associated with difficulties in rising onto the toes, and toe plantarflexor weakness impairs the grasping function of the toes when performing weight-bearing activities, resulting in impaired balance and functional ability.
Emerging evidence indicates that age-related reductions in foot and ankle range of motion and strength may be ameliorated by foot and ankle exercises, suggesting that the exercises below should be considered part of an overall rehabilitation approach to foot dysfunction.
The medial longitudinal arch of the foot plays an important role in ground force reduction and in generating sufficient power for propulsion when walking. The Short Foot exercise (video below) aids in creating a more robust medial, or inner arch.

Another great way to work the muscles of the foot is with Toe Grips and Toe Grip Progressions.
For progressions, marbles work best, but any small ball will suffice. The idea is to grasp the object with the toes and lift dorsiflex (see below).
Most people with shoulder pain or injury have a difficult time engaging in exercise, leaving them unsure where to begin correcting painful movement issues. Improving grip strength is an integral step in strengthening not only the hand, but can improve the movement capacity of the entire upper extremity. Physiopedia.com reports that rotator cuff activity is directly correlated to grip strength, “Gripping can be used to increase the flow of neural drive to all of the muscles in the extremity. This can lead to increased stability and strength of the entire upper quarter.”
A stronger grip can provide anticipatory stability to the upper arm, improve wrist function, and help prevent injury elsewhere in the arm and shoulder girdle. The neurological connection between the rotator cuff and grip is well established in studies and should be a major part of any exercise program. Measuring and improving grip strength is easy and can pay big dividends in achieving any fitness goal.
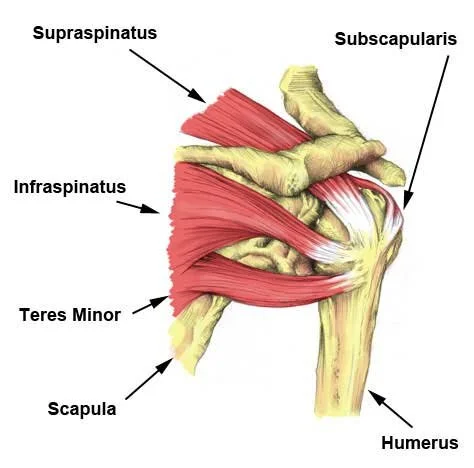
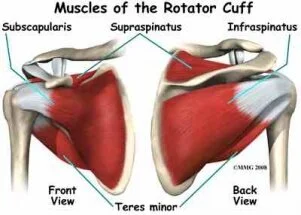
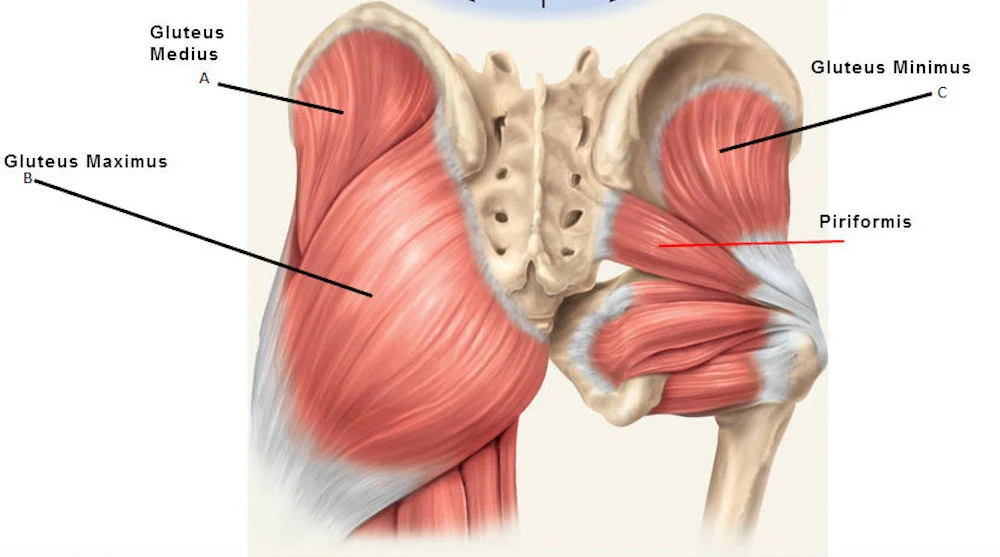
The rotator cuff stabilizes the humerus during all phases of reach. Dysfunction leads to shoulder injury, bicep tendon tears, and overall pain in the region. Imbalanced rotator cuff muscles cause poor posture if the subscapularis, the largest of the 4 rotator cuff muscles, is short and tight, and is a key muscle in correcting rounded shoulders, or slouching.
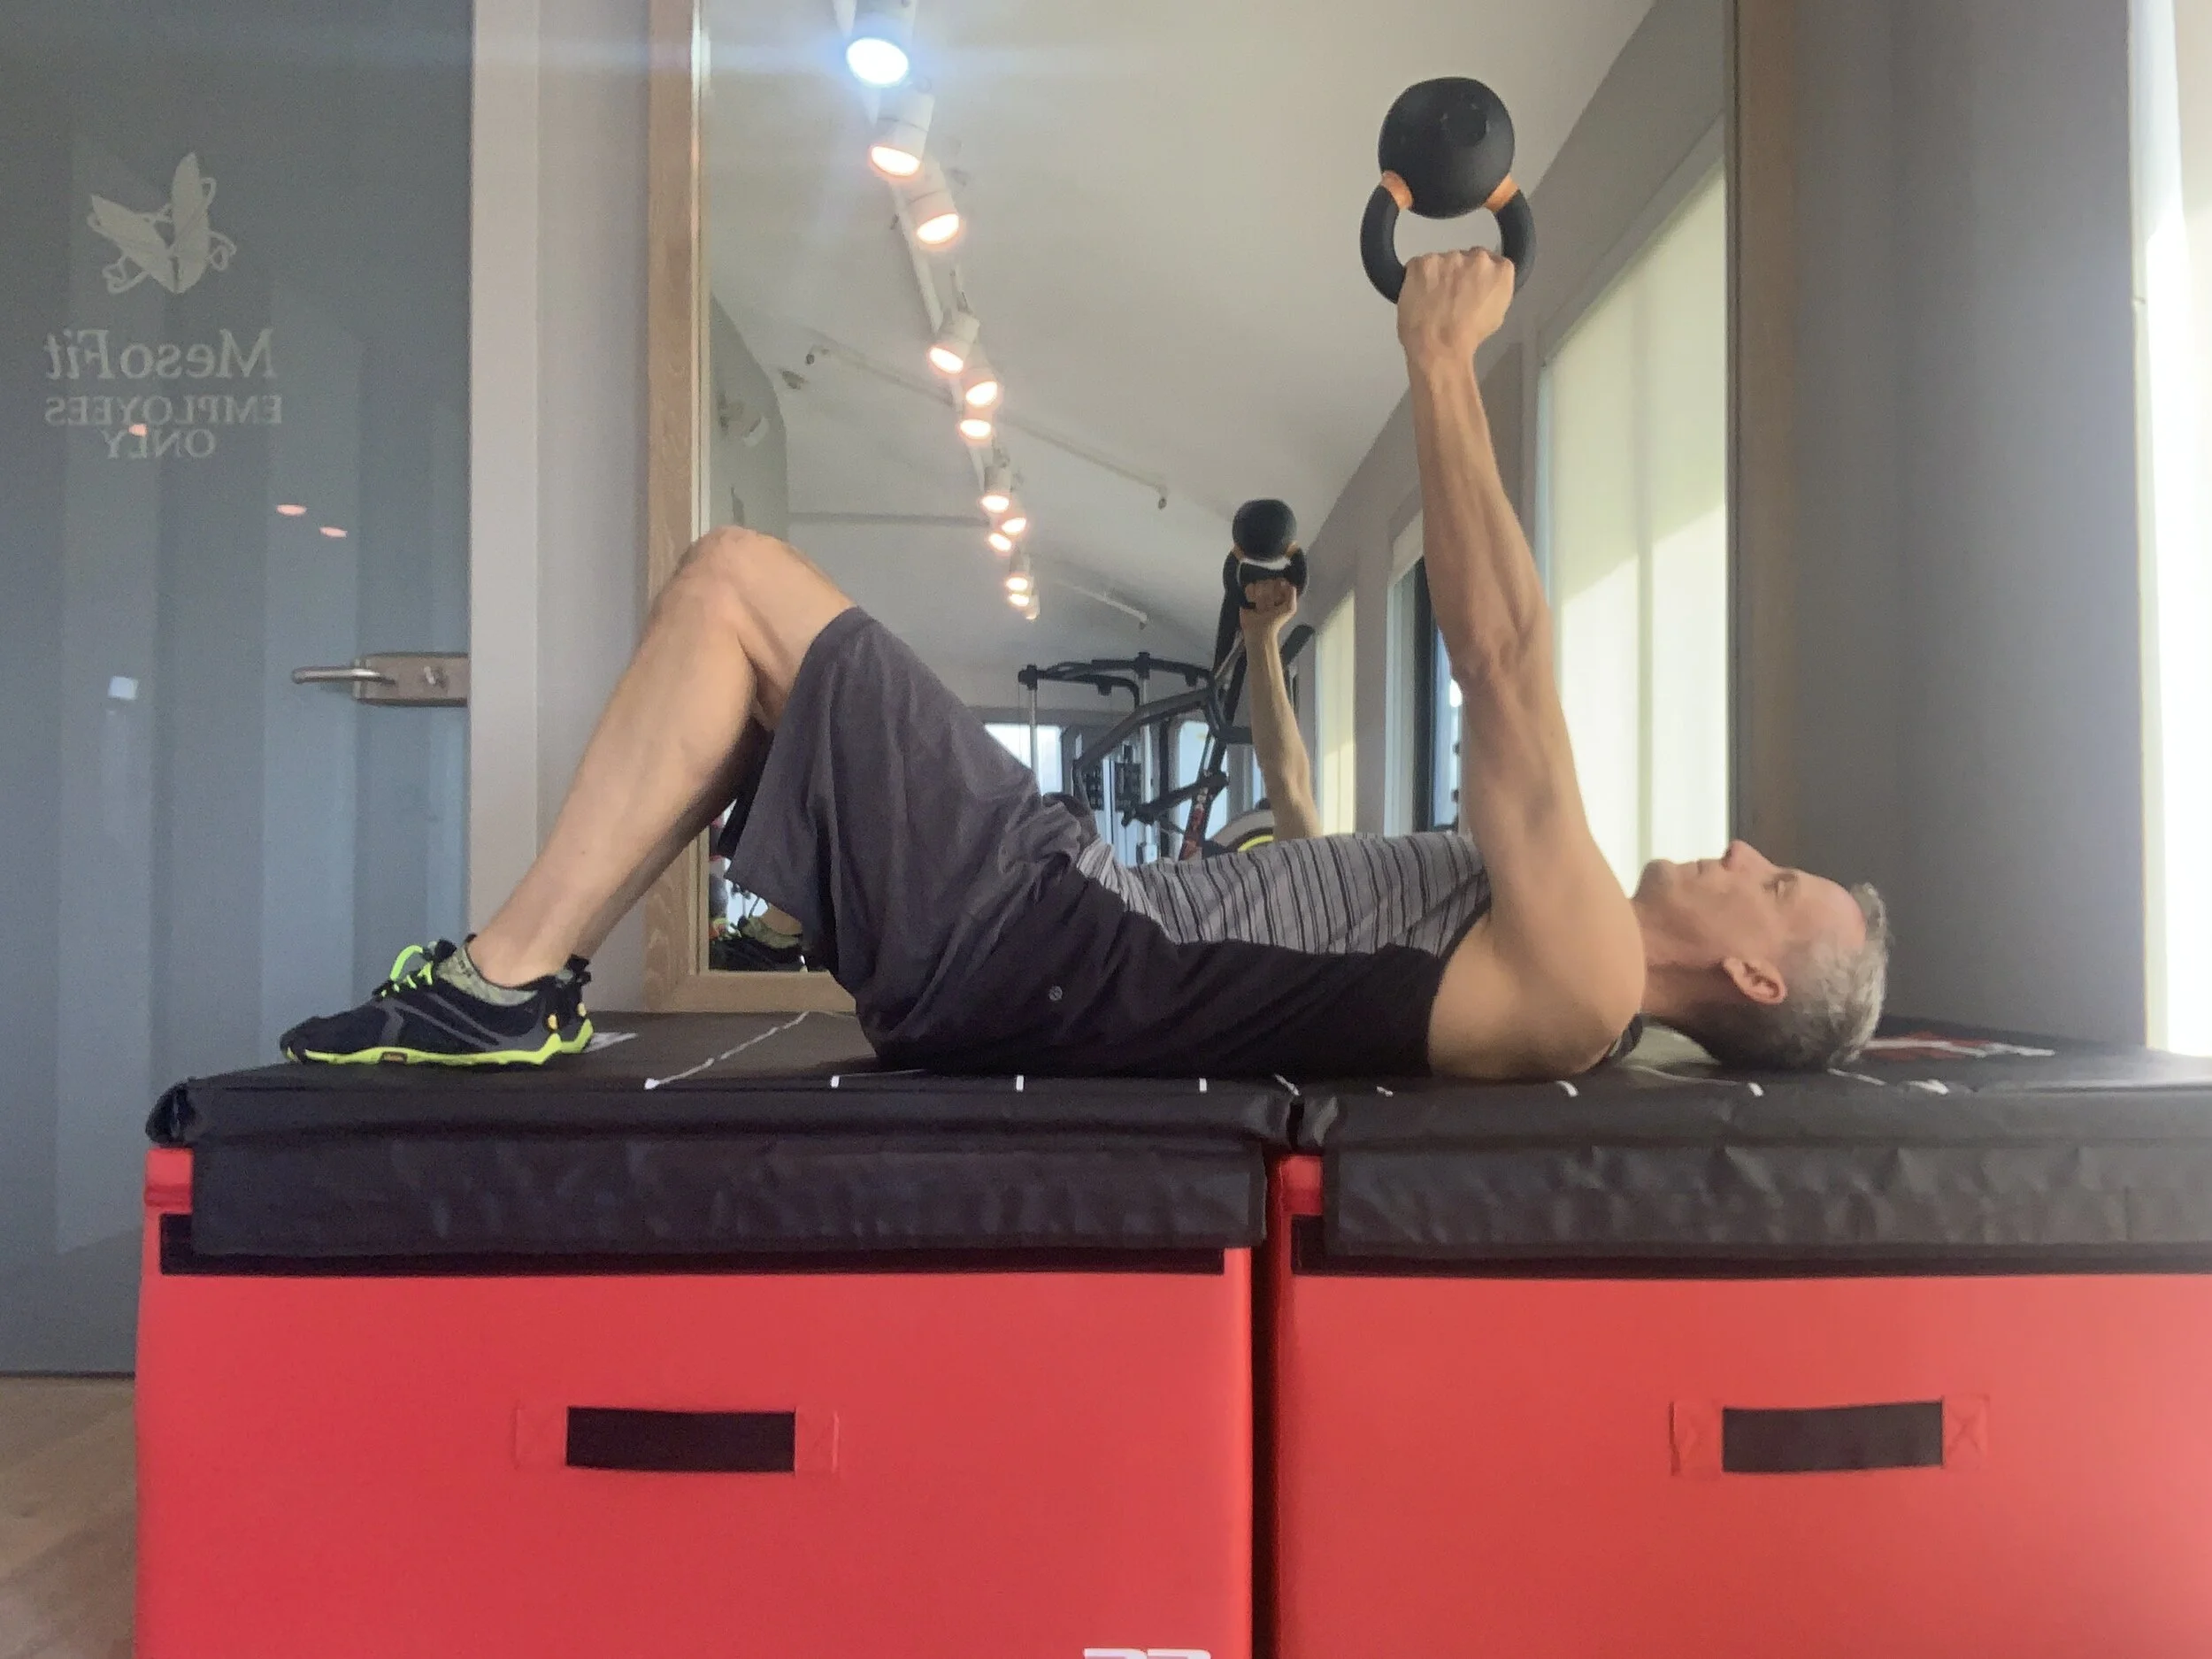
When short and tight, this internal rotator causes chronic slouching. But the latissimus, pectoralis, and teres major are also internal rotators of the humerus and need to be ruled out as slouch contributors. The picture above shows just how many upper body muscles attach the upper arm to the torso. The grip test below challenges the rotator cuff muscles to stabilize the kettlebell and reveals weakness in the grip/rotator cuff connection.
When applying myofacial release (foam rolling) to the under arm, musculature in need of release will be tender or painful. Slight movement left to right and up and down will apply adequate pressure to the muscles and provide them temporary blood flow. This is an ideal time to stretch these muscles.
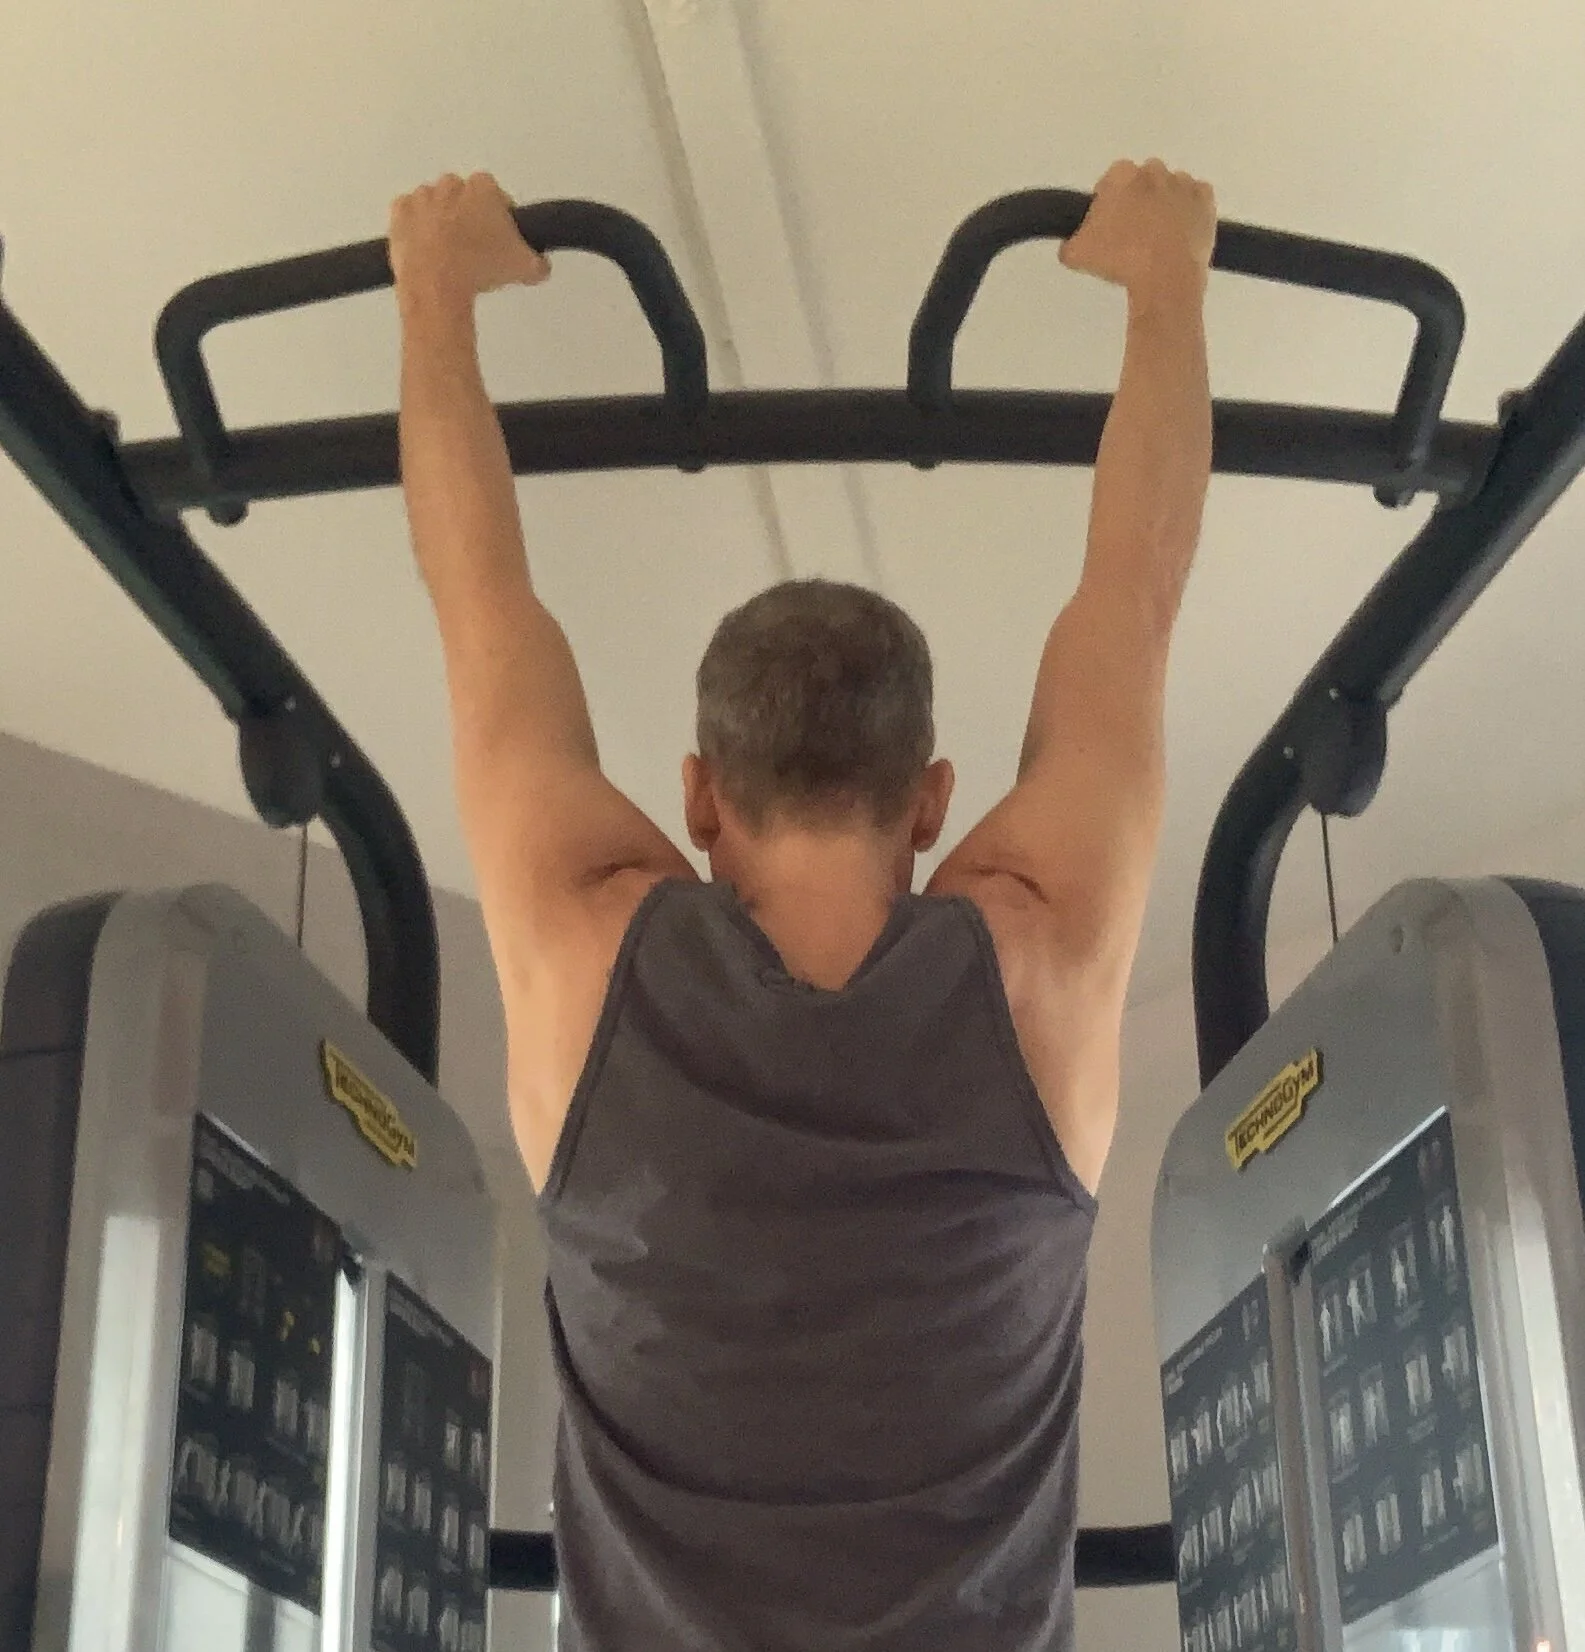
Simply hanging from a chin-up bar not only strengthens grip, but also decompresses the spine. This is one of the only ways to reverse the effects that gravity, and misaligned movement, have on the spine. Much like an inversion table, this creates space between vertebrae and relieves the pressure caused by vertebral compression. To be effective, only your hand grip should be tense with special attention paid to the thumb and first two fingers, while the rest of the torso remains relaxed. Any residual tension in the torso will decrease the efficacy of this stretch.
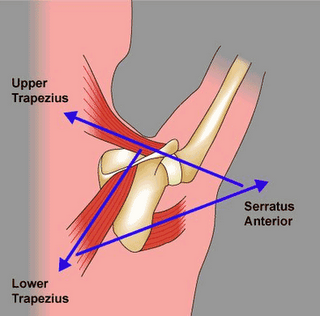
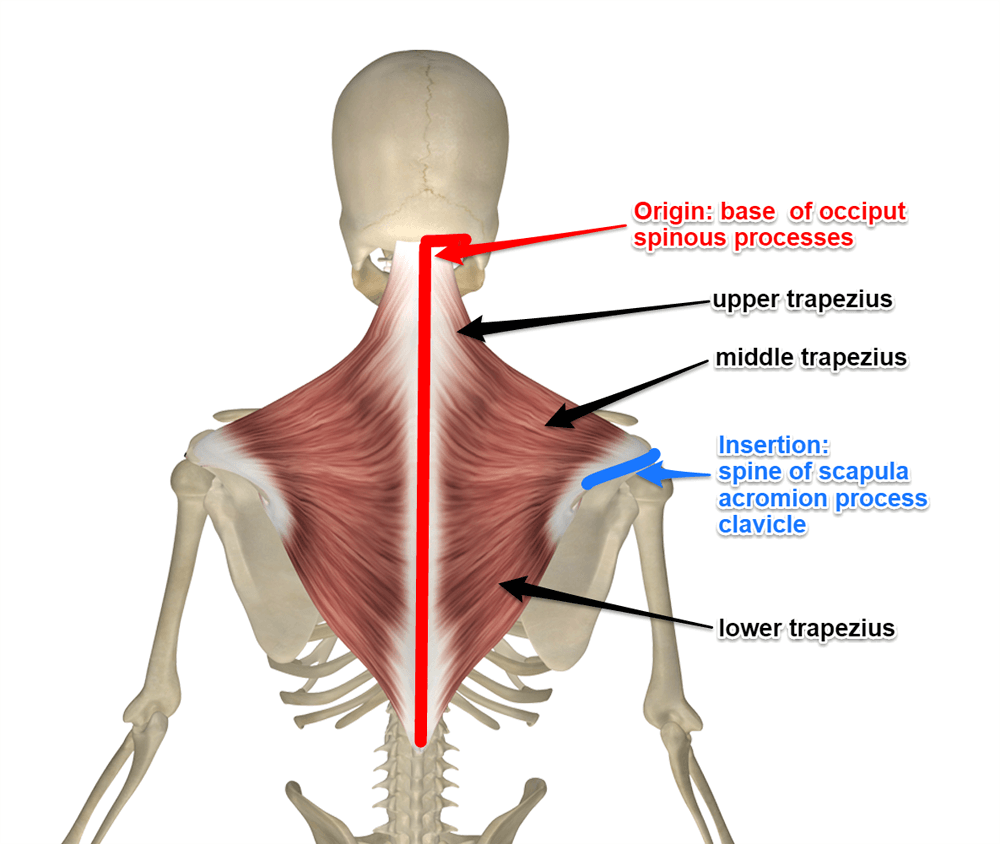
“The upper trapezius muscle, which is the upper component of the force-couple that controls the scapula, can be more dominant than the lower trapezius muscle. The trapezius muscle adducts and upwardly rotates the scapula, but the upper portion of the muscle elevates the shoulder while the lower portion depresses it. Excessive elevation of the shoulder is attributed to the dominance of the upper trapezius and a failure of the lower trapezius to counterbalance this action.” Shirley Sahrmann
Skewed upper/lower traps need immediate attention and is an ideal place to apply Release-Stretch-Contract protocol. The upper traps often present as short and tight, especially in desk jockeys, carpool moms, and anyone seated for any length of time. This muscle has attachments that can affect the scapula, neck, and shoulder. Conversely, the lower traps can become long and tight and lack contractile ability. To keep the shoulder blade in its middle the upper and lower traps form a force-couple, or a synergistic relationship, where if one is off balance they both suffer dysfunction and create imbalances elsewhere in the region.
RELEASE: The upper trapezius using a lacrosse ball. Start close to the spine and move outward toward the shoulder joint.

STRETCH: Getting length from this muscle requires depression of the shoulder blade or contracting the lower trap to get the upper to lengthen. Assume the position below and depress the shoulder blade and hold for 30 seconds to 2 minutes.

CONTRACT: Use the exercise below to contract the lower traps after releasing and stretching the upper traps. This will improve the force-couple over time and correct dysfunction therein.
PROGRESSIONS:
What’s the best way to get lean and strong fast?
Breathe deeper.
The breath has been the focus of every health discipline, and when unabated, mindful breathing calms us, makes us think clear, and assists in fluid, graceful movement. Increasing breathing capacity begins with releasing anything and everything that restricts full, oxygenating, breath.
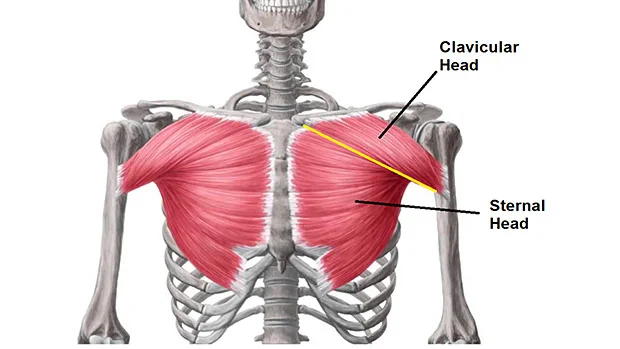
When the pectoralis major (chest) muscle is short and tight it causes slouching, excessive internal rotation, and restricts expansion of the ribcage. While how to breath is still debated, muscles with ‘strap-like’ features can, and will, restrict breathing when dysfunctional.
The clavicular head of the pec major is of particular concern because when tight, it affects not only breathing, but will restrict the shoulder and its ability to externally rotate. The attachments along the clavicle (collar bone), and the humerus, implicate this muscle in breathing, postural, and shoulder dysfunctions.
RELEASE: Place a rolling stick or lacrosse ball against the wall and put downward pressure on the clavicular head of the pec major. Once the tissue is pinned, slowly try to externally rotate the arm. Move the stick or ball inward toward the sternum and repeat.

STRETCH: With the arm held at a 90 degree angle lean against a wall and slowly lengthen the pectoralis major.

CONTRACT: Use the Grid Stick or ball as a pivoting point to find more external rotation.
This progression brings in additional core, coordination, and diagonal patterning.
At Meso Fit Boca, we strive to incorporate as much of the brain and body into every exercise because we know the body is connected in ways traditional isolationist training doesn’t address. The bridge is arguably one of the best ways to incorporate the glutes into exercise. It’s also a great way to train in full hip extension, which strengthens the core’s anti-rotational strength ideal for creating a stable spine in all movement.
The instability created when doing the single leg and arm versions are ways to progress these exercises once the double arm and leg versions are mastered. The exercises below allow multiple variations. Always start with the version that allows the best form. Lack of proper form in any progression evidences the brain’s rejection of the pattern; regress and establish proficiency in the previous pattern before progressing.
Bridged Alternating Press
Bridged Pullover
Bridged Fly W/Stable Side Hold
Bridged Tricep Extension (single leg shown below)
Bridged Rear Lateral W/Stable Side Hold
Progressions:
Any single leg version (examples below)
These can be done in a circuit, traditional 3 sets of 8-12, or added to a current program.
PROGRESSIONS:
When the foot and ankle are off balance it provides ample evidence that dysfunction looms above. The footpad, or bottom foot, is rich in nerve endings that send proprioceptive feedback to the brain with details of the terrain. Simply put, the brain is very interested in hearing where the foot stepping and landing.

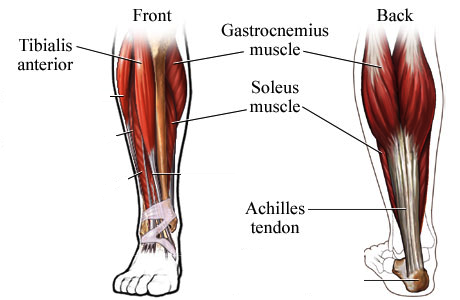
Paved roads and walkways, and consistent step-height, pose significant threats to ankles designed over millions of years to cope with multiple changes in pitch and texture from one step to another. It is questionable whether any intervention applied to dysfunction above these two structures can be fruitful without simultaneous correction of issues in the foot and ankle. Tight gastrocs, or calf muscles, restrict the ankle and create imbalanced arches in the foot. This leads to power loss, overuse injury, and compromised gait (walking).
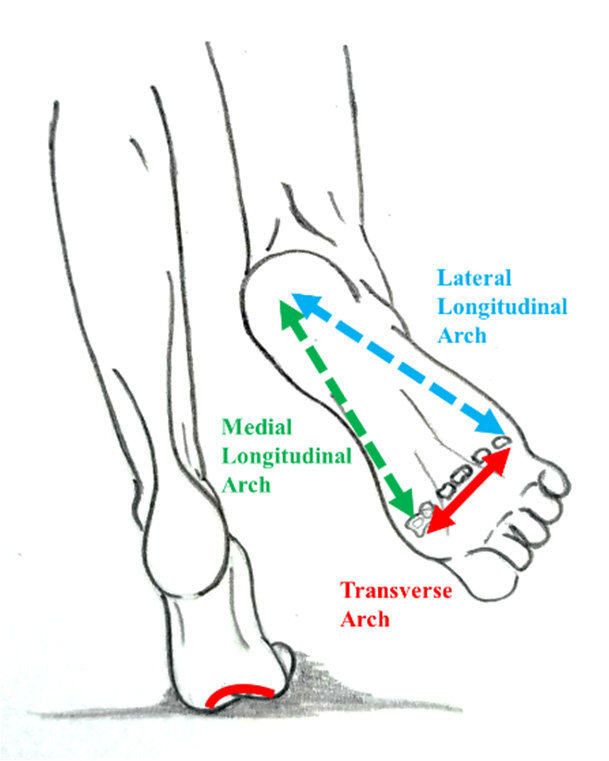
Creating more balance between the arches starts with following the Release-Stretch-Contract protocol below because the arches play a major role in all movement including but not limited to:
Supporting all bodyweight
Balance
Absorbing shock
Transferring ground reaction forces
Compensating for malalignment
The musculature between foot and ankle, ankle and knee, and knee and hip, function together to provide shock absorption and critical balance to the rest of the system. Instability in the ankle points to imbalances in the calf muscles, and the opposing muscle, the tibialis anterior. When the calves shorten due to over plantarflexion, the tibialis anterior is weakened. The calves need to grant extensibility in order to get the tibialis anterior to contract and balance the delicate foot equation that doesn’t end there.
For now, we’re just concerned with creating greater dorsiflexion.
(In later posts, we’ll explore other imbalanced equations such as long, over-stretched lateral gastroc and peroneals, and short and tight medial gastrocs, that also create instability in the foot and ankle.)
Protocol: Perform three rounds of each, aiming for increases with every round.
RELEASE: GASTROC: The idea is to place the meatiest part of the calf on the stick, find a tender spot, pause, relax, breathe, and move slowly from dorsiflexion (where the calf is forced to lengthen), to plantar flexion where a short and tight calf will find relaxation, or the least amount of residual tension. Find 3 different spots in the calf that feel tender and perform 10 pull and points of the foot (dorsi-into-plantarflexion).


STRETCH GASTROC: Because you stand into this stretch, some measure of bodyweight might get dumped into the other leg, be sure the heel always remains in contact with the ground. Advance the foot forward as the muscles and fascia begin to relax and be conscious of any flexion occurring in the hip and/or knee that result from over-stretching the calf. This takes time, patience, and frequency to see changes above and beyond what is achieved during a session.


CONTRACT INNER ARCH:
Slanted Calf Raises- Lift the heel only as high as perfect form dictates. Any rotation or bending of the knee is a compensation and needs to be controlled.


CONTRACT TIBIALIS ANTERIOR– Pull the foot as evenly and as far into dorsiflexion as possible while maintaining good form.


Meso is a biology prefix meaning middle. After age 30, doctor visits associated with some type of movement dysfunction top the list of emergency-room complaints. At Meso Fit Boca, we believe that’s because faulty soft tissue, or the brain’s software, is running on faulty programming. Young or old, previously injured, tight, performance athlete, or soccer mom, The RAMP Method is designed to bring the body back to when it moved best.
When it moved flawlessly.
The point where it moved completely aligned in its middle.
Any lack of joint range of motion forces the brain to borrow movement from elsewhere, usually the spine. Losses in hip and knee range of motion, coupled with restricted dorsiflexion of the ankle, add up to moving compensated, where the risk of injury increases. To get the body to move in its middle is no easy task. Overall improvements in daily movement can only occur with conscious awareness of prevalent side-dominance issues performed throughout the day (like brushing teeth, shaving, or eating with the non-dominant hand).
People tend to use, and practitioners tend to administer, corrective exercise long after it produces the desired result; which is to relieve pain, realign joints, and make the body function better outside of training. Corrective exercise should produce instant results. Done too long, they may cause the imbalance they seek to correct.

To improve overall movement takes creating new space to move in. Restricted feet and ankles impede the progress of all other joints and any intervention administered above them turns into a dead end. Because the foot and ankle bear all bodyweight, they need to be prioritized and any dysfunction cleared. The following exercises should be done after adequate dorsiflexion restoration (See Release-Stretch-Contract: Gastroc/Tibialis).
The Meso-Style Workout: These multi-joint, multi-directional movements require balanced feet and ankles capable of adequate dorsiflexion. Extending out of a lunge or step-up in the forefoot loads the knee and is the result of faulty weight distribution. Forefoot loading leads to knee, hip, and ankle issues and should be avoided. The ankle should remain dorsiflexed through all phases of hip and knee flexion and extension unless otherwise specified.
All exercises can be added to your existing plan and added as 3 sets of 10, or circuited with round length and exercises done according to fitness level and available equipment.
Step Up Into SDL (single leg deadlift) W/Single Arm Curl/Press
Landmine Reverse Lunge Into SDL W/Single Arm Curl/Press
Reverse Lunge Into Cable Rear Lateral
Single leg Dorsiflexed Around The World
At Meso Fit Boca, our Release-Stretch-Contract protocol uses corrective techniques to pull joints affected by muscle imbalances back to their center. The rectus femoris is of particular concern because as a hip-flexor, its attachments cross both the hip and knee, two joints whose proper alignment are integral in producing fluid, efficient movement, and avoiding injury.

Dysfunction in the rectus directly affects the core’s ability to stabilize the spine and leads to compensations that change posture over time. In the coming months, we’ll map-out common dysfunctions that cause imbalances and show how to correct them with Release-Stretch-Contract protocol.

The rectus femoris adaptively shortens with excessive sitting (or flexion) throughout the day. Add the imbalance caused by sleeping fetal (more flexion), and you’ll see why assessing these imbalances, and correcting them, takes more than the typical work done in a gym. When the rectus shortens, the body cannot achieve full hip-extension because the glutes, the muscle opposing the rectus, has given up length to account for the short rectus (and other short hip flexors).
The glutes will then be in need of contraction. But lengthened glutes cannot just start contracting without the requisite room to do so. This room is created when the short rectus gives length. This point cannot be understated as any attempt to contract a lengthened glute without prior rectus release and stretch will likely cause compensation in the lumbar spine or a cramp in the hamstring.

Release-Stretch-Contract Protocol: Rectus Femoris
RELEASE the Rectus Femoris- apply pressure to the muscle so that it will grant the necessary extensibility required of the next step, which is to ask the brain to use that momentary extensibility to grant further length with the stretch (below)..
To STRETCH the rectus, aim for passive hip extension, not excessive stretch. If felt in the lower back, regress the stretch to where you can achieve full extension by lowering the bench. Do not progress until passive hip extension is achieved and can be held for longer than 2 minutes.

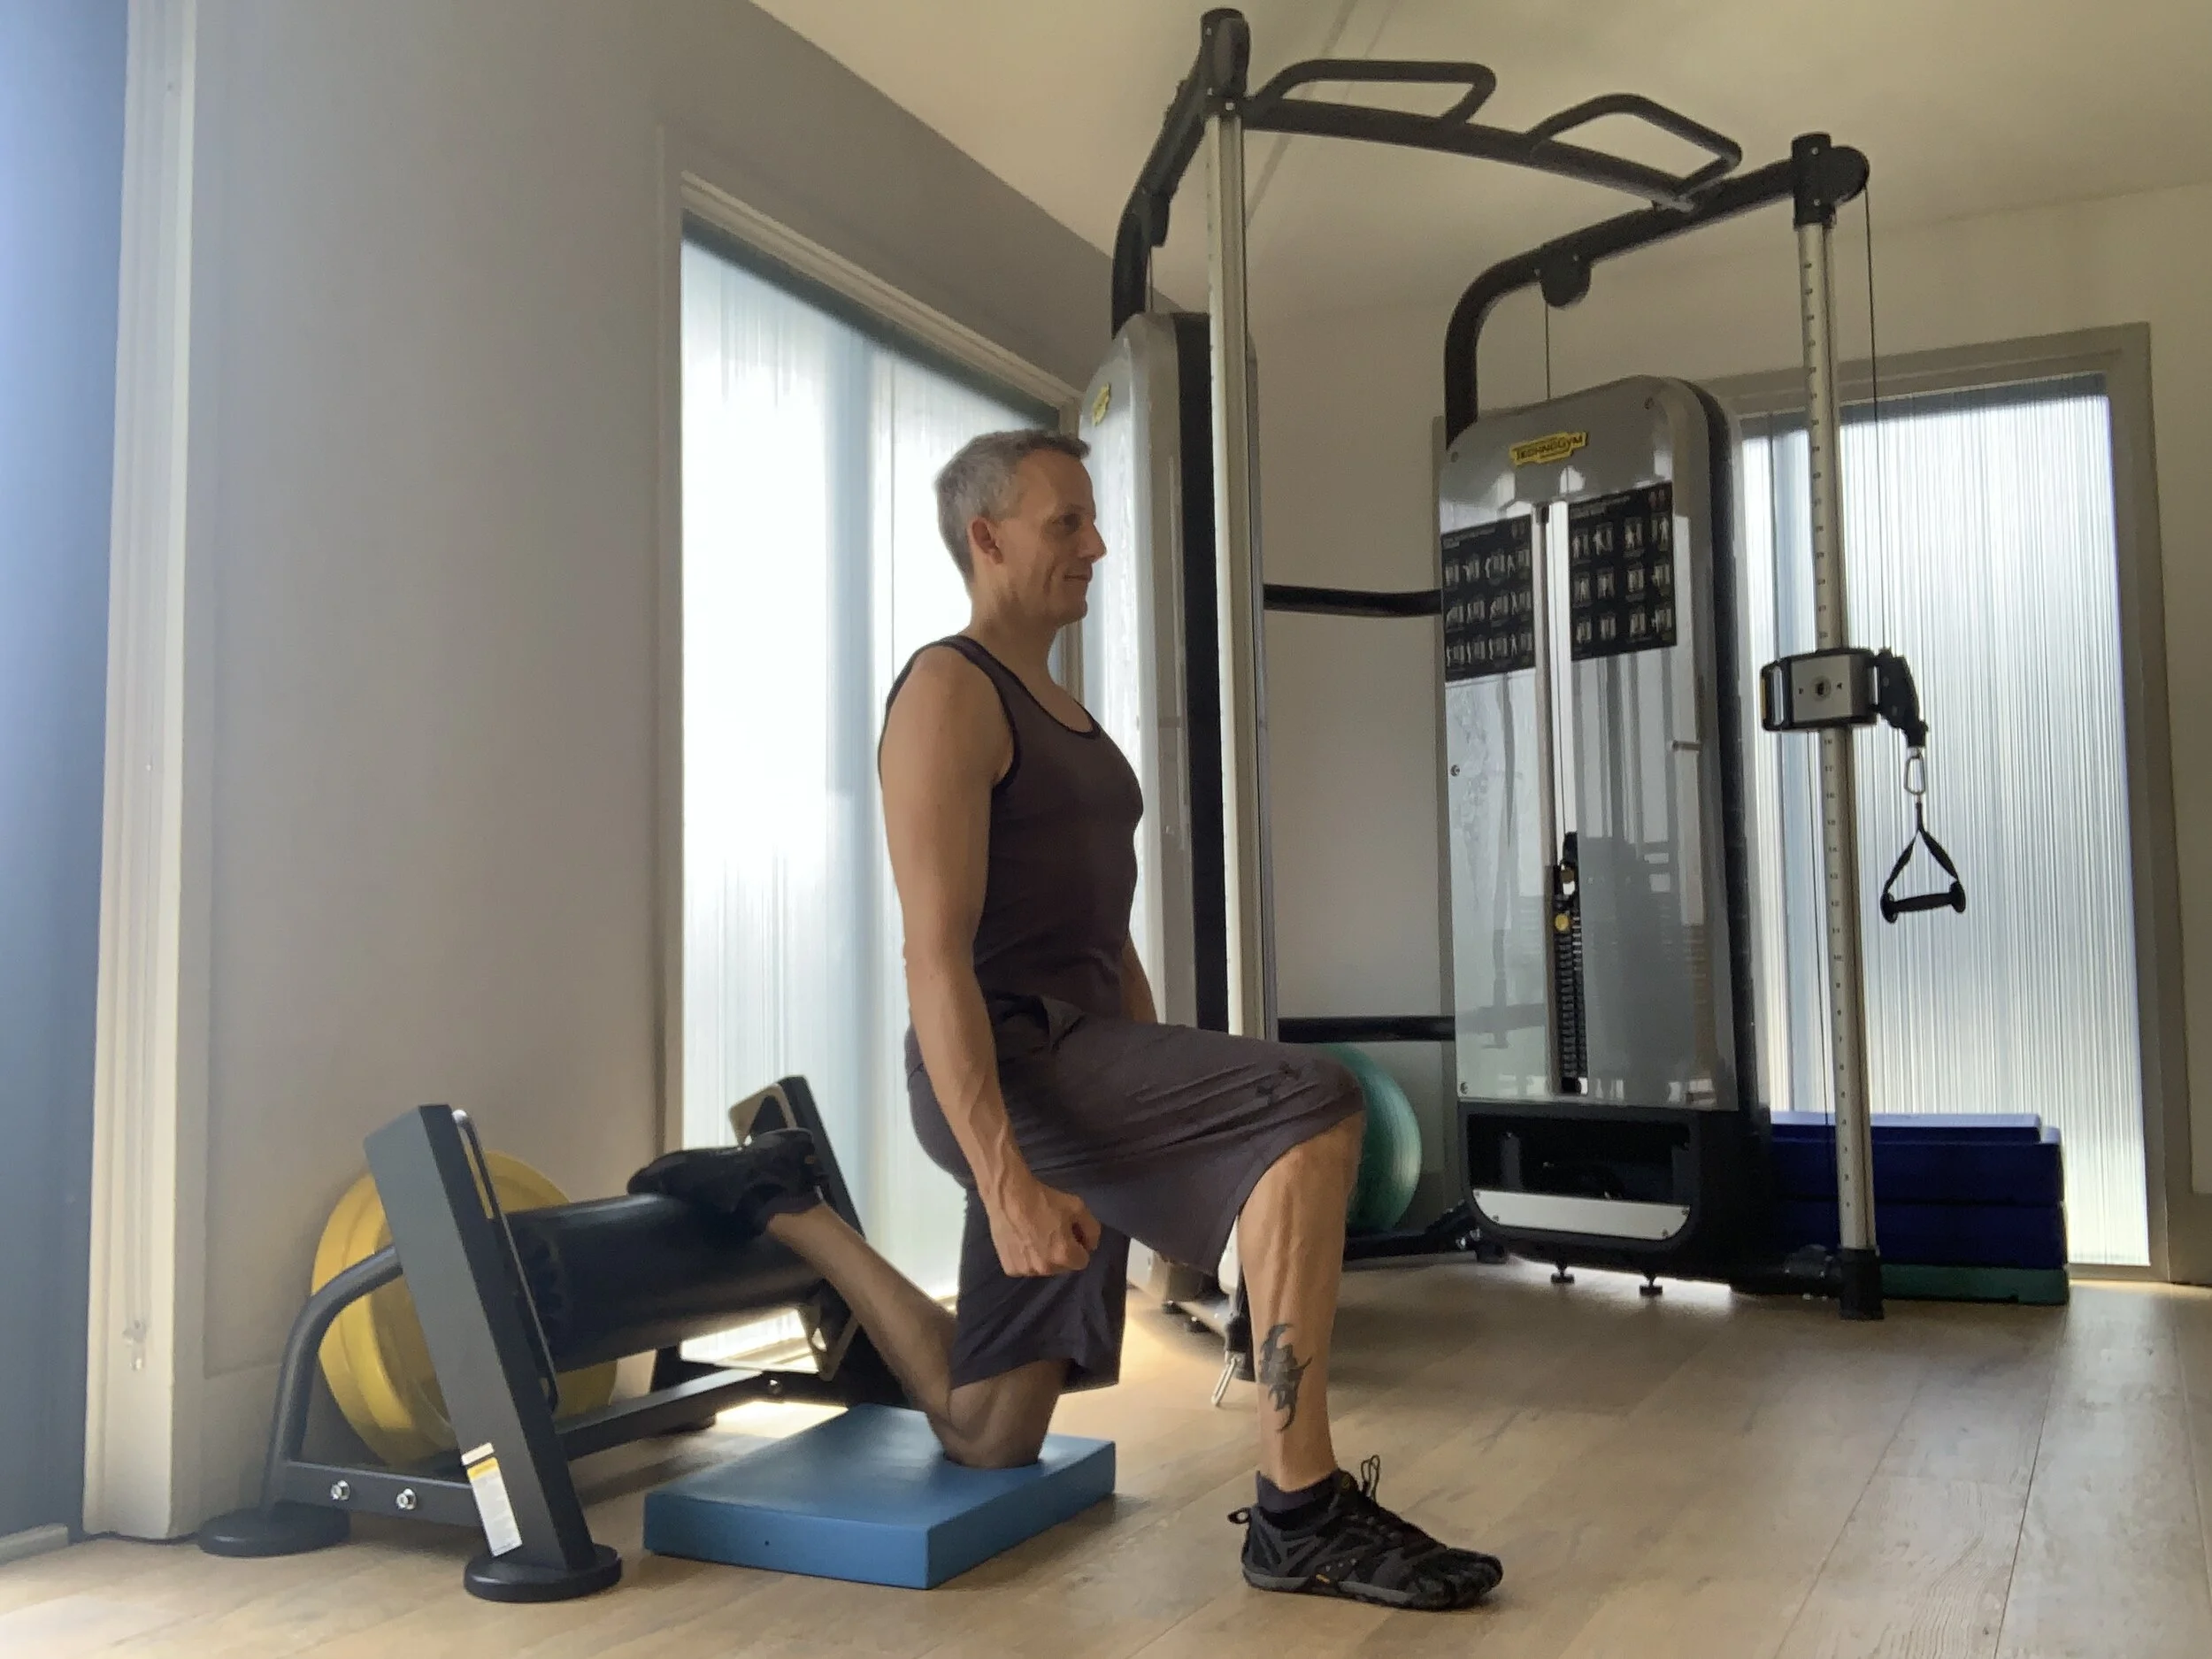
CONTRACT the glutes with the Split Squat W/Front Foot Dorsiflexed variation. This will undoubtedly expose balance issues. Dorsiflexion should be concurrent with hip and knee flexion if each leg is to produce the same amount of power and avoid injury. If this exercise causes too much instability, regress to the non-dorsiflexed version.
Early in my career I had the pleasure of training a professional hockey player. That summer, trade talks loomed as my client approached the final year of his contract. His goal was to make himself more marketable by earning assistant captain. To do that, he needed to excel in the team’s preseason physical fitness tests.
One of the tests was running a mile in under 7 minutes. The players’ sluggishness was often blamed on offseason debauchery. But running a mile was completely contrary to what players did on the ice, and every coach knows that keeping players on the field or ice longer than their endurance dictates creates scoring chances for the opposing team. This adds credence to the edict: Train slow, be slow.
Halfway through his summer training regimen (consisting of circuits that would cause most a massive stroke), the team hired a new coach that changed the preseason physical fitness tests, especially the run. To build their endurance and power, he proposed the following cardiovascular test for the team:
Sixteen 100-yard sprints each done in under 16 seconds.
With each 16 second sprint, the player had the rest of a minute to recover.
Any sprint done in over 16 seconds was considered a failed test.

Clues on how we ‘should’ train the cardio vascular system are apparent in how kids and dogs play. They never hold back. They push to the brink until forced to recover. This tenacity is missing from steady-state cardio and distance-running.
Evolution designed the cardiovascular system for short-duration, powerful bursts of speed to escape imminent threats. The fight or flight response is adept at avoiding danger because it calculates and initiates escape often before the brain can even weigh-in, and training needs to mimic this or the brain won’t allow faster speed and/or coordination.
A sprint is defined as an all-out-effort, meaning every joint contributes to the burst of energy that although brief in duration, pays bigger dividends than distance cardio. The major difference between sprinting and distance-running is the form one assumes to complete both actions. Sprinting naturally places bodyweight and foot-strike in the balls of the feet and requires full flexion and extension from both the hips and shoulders. Distance-running creates heel-strike, where the ankle is the first contact with the ground. This is believed to cause faulty force absorption, which may lead to greater risk of injury.
To absorb the shock of foot-strike and to react properly to ground force the ideal placement for foot-strike is in the forefoot. But to change from a distance heel-striker to a distance forefoot-striker takes time and forethought. Short distance, all-out-effort, sprints have proven to be an effective change for distance runners in the offseason and is ideal for those seeking to lose fat and not muscle.
To determine which style of cardio is right for you, choose the body you want to emulate; the sprinter on the left, or the marathoner on the right:

To begin a sprint program, each all-out-effort needs adequate recovery time. These are usually presented as ratios and coaches vary in what they consider to be adequate recovery time. Most agree that a 1:1 ratio (10 second sprint with 10 second recovery) isn’t enough. The sprint test for hockey players above is a 3:1 ratio with recovery being 3x higher than the all-out-effort (16 work to 44 recovery). Although not as ideal as an 8:1 ratio, where the athlete has 8x the recovery time to work; 3:1 seems adequate rest for ideal performance.
The StairMill Workout:
Warm-up at recovery speed (level 3 to 5 depending on the machine). Remember, the recovery level should be low enough to give you a chance to be 100% for the next sprint.
At the 5th minute increase the level to 10 for 45 seconds
Recover- at the 7th min increase to 12 for 45 sec
Recover- at the 9th min increase to 14 for 45 sec
Recover- at the 11th min increase to 16 for 30 sec
Recover- at the 13th min increase to 18 for 30 sec
Recover- at the 15th min increase to 20 for 30 sec
Recover- at the 17th min increase to 22 for 20-30 sec
Recover- at the 19th min increase to 24 for 20-30 sec
StepMills vary from brand to brand so adjust levels accordingly.
Progressions: The ratios will be different depending on the sprint. Adding the sled or bungee will add load and strengthen non-loaded speed and efficiency. Try the 10 sec to 30 recovery for 10 sprints to start.
Sled Push
Sled Pull
Transverse Slam
Bungee Sprints
At Meso Fit Boca, we take systematic approaches to things like movement prep to allow us to see progress from workout to workout. The following multi-plane movement preparation and workouts are just examples of how our programming can take you to the next level. The variations below allow you to use these movements as is, or peppered into your current program.

Remembering the planes is easy. If you imagine standing in a hallway where your shoulders almost touch the walls, the movements possible in that hallway happen in the sagittal plane. The coronal plane is best described as any movement possible with walls directly in front and behind you. And the transverse plane is where rotation occurs.
At Meso Fit Boca, we differentiate movements from the spine from movements of the extremities. The joints best suited for flexion, extension, and rotation, are the shoulder and hips, and they should create the majority of movement. That doesn’t mean that movement from the spine is against some unwritten law of physics. Plenty of people move from the spine and never have an injury. We just believe that for longevity, creating maximum power takes a stable spine.
We use Multi Plane Movement Prep before engaging in anything strenuous. This simple series of movements moves you through slow steady stretches and transitions that prepare you for the multi-plane movements below. First, work on moving into each pose after 5 full, deep breaths. Take your time.
Multi Plane Movement Prep:
Multi-Plane Workout:
Sagittal Lunge W/Side Reach- 3 Sets
Coronal-Plane Lunge W/Reach- 3 Sets
Transverse-Plane Lunge W/Reach- 3 Sets
Shuffles- 3 sets
Sagittal Jumps- 3 Sets
Single Leg Sagittal Jumps- 3 Sets
(Should any of these multi-joint exercises create excessive compensatory movement, regress to non-loaded versions)
Progressions:
Multi-Plane Lunge
Single Leg Deadlift W/Side Shifts
Box Jump to Step-down to Reverse Lunge (both sides) to Burpee to Side Lunge (both sides) to Transverse Lunge (both sides)
3 sets each